
Bible Car Decals is Christian Car Stickers, we are now on over 5000 cars and counting.
Be part of something bigger.
Join us now in “Spreading the Word of GOD many Stickers at a Time!”
L
L
God is Good All the Time. All the Time God is Good!
Proclaim God’s Goodness On The Go!
Be part of Bringing in the Harvest
How To Apply Your Decal
Due to the intricacies of the design of our decals, do not start peeling your decal until you have gone through the instructional video and read the instructions below.
How to Apply Bible Car Decal (White)?
** For the decal to last long, avoid applying decals on areas that will encounter the windscreen wipers and also the side windows that may be rolled down.
How to Apply Bible Car Decal (Gold)?
** For the decal to last long, avoid applying decals on areas that will encounter the windscreen wipers and also the side windows that may be rolled down.
- Step 1 - Clean:
- - Choose the preferred spot on your vehicle for your decal.
- - Clean the spot thoroughly with wet cloth/wipes then dry with a clean dry cloth, making sure that no dirt or dust remains.
- Step 2 - Peeling off the decal from backing:
- - Lay transfer tape and decal facing down on a flat surface.
- - At all times, handle only the clear transfer tape areas only, avoid touching any of the gold decal parts.
- - Start from one end to fold up the decal backing, peeling it from the transfer tape.
- - Continue to fold up the decal backing slowly, at the same time pressing it down firmly as you fold up the decal backing.
- - If any part of the gold decal is stuck on the backing surface, press that part of the backing back onto the transfer tape and apply more pressure with fingertips to the back of the backing until the decal part sticks onto the transfer tape.
- - Keep a close watch that no parts of the gold decal remain on the backing surface, but are all stuck to the transfer tape itself.
- - You may cut off the excess folded part of the backing that no longer has any gold decal stuck to it.
- - Continue the process until all the gold decal parts are stuck onto the transfer tape and backing has been removed.
-
Step 3 - Applying decal onto your vehicle:
- - Position one end of transfer tape with the decal onto the surface of the preferred spot on your vehicle.
- - Then using the squeegee, start rubbing firmly the rest of the transfer tape into place.
- - After the entire transfer tape with decal has been applied onto the surface, rub thoroughly and evenly the entire transfer tape with a few more firm strokes.
-
Step 4 - Peeling Off Transfer Tape from Decal:
- - Finally, start slowly peeling off the clear transfer tape from one corner with the squeegee pressing down behind where the transfer tape is being peeled off.
- - Be careful when peeling so as not to pull any part of the decal off the surface. (*If any part of the decal happens to pull away from the surface or remains stuck to the transfer tape itself, slowly place the transfer tape with the decal back to its position and rub firmly over the transfer tape with the squeegee a few times then try to gently peel off the transfer tape again.)
- - Continue peeling away the transfer tape until the entire decal has completely been transferred and stuck onto your vehicle's surface, then you have successfully applied your very own bible car decal!
- Note: Once completed, do not touch the decal. It will take 24 to 48 hours to set.
Recommendation:
We like to recommend that you apply the decal on a glass surface of your vehicle (eg. rear windshield), as applying the decal on any car paint surfaces has the high risk of scratches when you want to remove the decal.
Your Decal consists of:
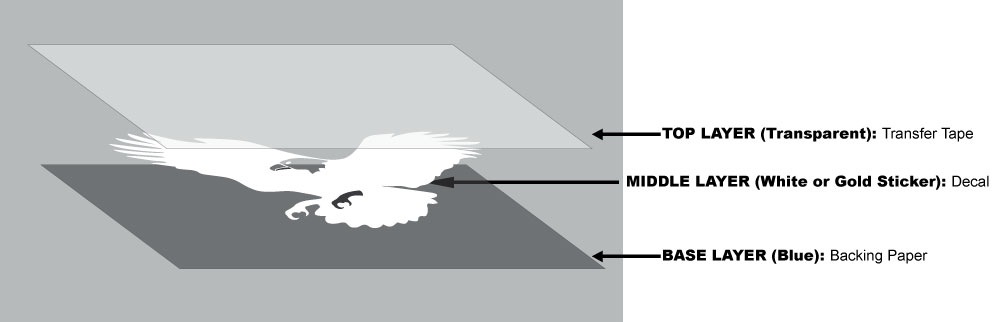
- Top Layer (Transparent): Transfer Tape
- Middle Layer (White/Gold Sticker): Decal
- Based Layer (Blue): Backing Paper
Aim:
The goal is to remove the white or gold sticker from the backing paper and on to the transfer tape then using the transfer tape to stick the white or gold sticker to the preferred spot on your vehicle. Discard sticker backing and transfer tape after the entire process is completed.
What's needed to apply your decal:
- Your Decal
- A squeegee or old credit card (or similar sturdy card)
- Some wet wipe or a clean and wet cloth
- A clean and dry cloth
-
A scissor
Helpful Tips:
- Decals are not reusable once applied, apply with care and patience!
- Recommended to read all instructions and watch the short video for better understanding before applying the decal.
-
Do not apply decal on hot, very cold or wet surfaces.
© Copyright 2020+ BibleCarDecals.Com